How & Where to Add My Installation Code?
Where Can I Put My Visual Visitor Code?
When you sign up with First VisitorID you receive a code to put on your website. This code can be placed within the body of a web page, the header, or the footer.
Does It Matter Which Place I Choose to Put It?
Yes, it does. If you put your installation in the body of a web page it will only track that one page. For example, if you put it on your site’s home page it will only track the businesses, people, and hits of that home page.
If you place the installation code onto the header or footer, it will track every page on your website.
“Below are various website platform instructions.”
How Does First VisitorID Capture Visitor Information?
Our in-house software application collects data from a variety of resources while the visitor is on your website. We can capture information a majority of different ways, on each individual provided its available.
- Cookie Data
- IP Address
- Open Source Databases
- Google Analytics
- Browser Data
- Artificial Intelligence (AI)
Installing First VisitorID on Duda
Placing code in the header
Site-wide header
To place the code in the site-wide header, follow the instructions below.
- Open your editor
- Go to settings in the left sidebar
- Click on “Header HTML”
- Paste in your code here and save
Single page header
To place the code in the header of just one single page, follow the instructions below.
- Open your editor
- Go to the pages section
- On the page, you want to add it into, click on the settings icon.
- Click “SEO”
- Scroll down to “Header HTML”
- Paste in your code here and save.
WordPress Plugin on Mac
You may run into the following issue when using a Mac.
Question:
When downloading .zip files on mac the .zip file automatically becomes unzipped. How do I install the WordPress plugin without the .zip file?
Answer:
Do the following so your zip files do not open automatically after you download them:
1) Go into Safari Preferences.
2) Page titled General.
3) Scroll down to the bottom.
4) Deselect the box with the text “Open safe files after downloading”.
5) The plug-ins will now download as a .zip file which uploads seamlessly to WordPress.
The key is to upload the .zip file via the WordPress plugin uploader interface (not the unzipped folder)
Installing First VisitorID on GoDaddy
You can add JavaScript and HTML code to your Godaddy website to display custom page elements, such as third-party apps.
- Log in to your GoDaddy account.
- In your Products list click Website Builder, and then click Manage next to the account you want to use.
- Click Design Your Pages.
- If necessary, from the Page menu, select the page you want to modify.
- Click Popular, and then drag and drop the Script icon over a Drop Zone. Drop Zones display on your Web pages when you hover over them.
- In the Enter JavaScript text box, delete the default scripting, and then enter your First VisitorID tracking script.
- Click OK.
- Click Publish in the upper right.
Installing First VisitorID on LightCMS
Step 1. login to your LightCMS website.
Step 2. Navigate to your “Content” page.
Step 3. Select the page settings cogwheel on the right.
Step 4. Select the “Advance” tab.
Step 5. Scroll down to the “HTML Head” Section.
Step 6. Paste the First VisitorID Tracking Code and click save.
Step 7. Your First VisitorID Tracking Code is now installed.
Installing First VisitorID in Joomla
Step 1. Login to the Joomla Administration panel.
Step 2. Click on the “Template Manager” link.
Step 3. Select the “Templates” tab.
Step 4. Locate the Template you website is using, then select its title.
Step 5. Click on the “Edit Main Page Template” link.
Step 6. Locate the </head> closing tag and insert your Visual Visitor Tracking Code above it.
Step 7. Click on “Save & Close”.
Step 8. Your First VisitorID Tracking Code is not installed.
Installing First VisitorID on Magento
Step 1. From the Administration menu, select system –> “Configuration”.
Step 2. Select “Design” on the left-hand side panel.
Step 3. Click to expand the HTML Head Section.
Step 4. In the “Miscellaneous Scripts” text box, paste the Visual Visitor Tracking Code.
Step 5. Click the Save Config Button.
Step 6. Disable Placeholder Polyfill.
Step 7. Your First VisitorID Tracking Code is now installed.
Installing First VisitorID in Wix
To get started with Tracking Tools & Analytics:
1. Go to Settings in your site’s dashboard.
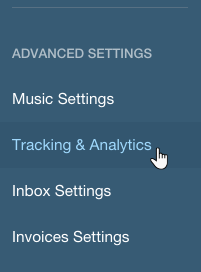
2. Click the Tracking & Analytics tab under Advanced Settings.
3. Click + New Tool and select a tool:
- Google Analytics
- Google Tag Manager
- Facebook Pixel
- Yandex Metrica
- Verification Code
- Custom
For each option, such as Facebook Pixel or Google Analytics, Tracking Tools & Analytics automatically sends a pageview event to the code manager. If you wish to add a third-party tracking code that is not listed above or to track other events, such as clicks, you can do so using the following options:
- Google Tag Manager
Google Tag Manager allows you to implement practically any third-party tracking code or pixel. This tool allows you to track pageview events and clicks. Click here to learn more. - Custom
Use the Custom option to implement free or untested third-party tracking code. Click here to learn more.
Important information about Tracking Tools & Analytics:
- Your site must be published in order to use this feature.
- Your code snippets are associated with a specific domain. If you assign a different domain to your site your code snippets will be deleted.
- There is no need to add code snippets to your secondary domain, as all traffic is redirected to your primary domain.
- Wix does not provide support for technical difficulties associated with third-party code snippets. If you are experiencing an issue with your code snippet, please contact the provider directly.
- It is not possible to add code snippets to lightboxes or anchors.
- Code snippets are not added to your site as an iFrame, and are invisible to your site visitors. If you wish to embed visible code on your site, use our HTML app. If you want your site’s elements to interact with your site, and for more advanced features such as building web applications, head to Wix Code.
Ref. https://support.wix.com/en/article/about-tracking-tools-analytics
Installing First VisitorID on QuickSilk
Step 1. Login to your QuickSilk Dashboard.
Step 2. Select the “Settings” icon and click on “Header Code Insertion”.
Step 3. Paste the First VisitorID Tracking Code and click “Save”.
Step 4. Your First VisitorID Tracking Code is now installed.
Adding First VisitorID Script on DotNetNuke website
Note: The steps for installing Visual Visitor on dotnetnuke websites differs from website to website. The installation procedure varies, depending on how your website is built.
The best way of putting the tracking code into your website is by putting the code directly into the skin of your website. This will add the code automatically on all the DNN pages. This means that you will only have to add the code to each skin that you use and then the code will be placed in all the pages on your website. You can do this by putting the code at the end of a skin. The html code in a skin does not include the html and body tags, so all you do is paste this code at the end of the skin.
The traditional First VisitorID code looks like this:
<script type=”text/javascript”>
var vv_account_id = ‘abcde12345‘;
var vv_BaseURL = ((“https:” == document.location.protocol) ? “https://frontend.id-visitors.com/FrontEndWeb/%22 : “http://frontend.id-visitors.com/FrontEndWeb/”);
(function () {
var va = document.createElement(‘script’); va.type = ‘text/javascript’; va.async = true;
va.src = vv_BaseURL + ‘Scripts/liveVisitAsync.js’;
var sv = document.getElementsByTagName(‘script’)[0]; sv.parentNode.insertBefore(va, sv);
})();
</script>
Note: Whenever you update your dotnetnuke site, always remember updating the file SiteAnalytics.config as well. Otherwise, it will be updated to its default version.
How Does First VisitorID Work?
When a visitor clicks on your website, we assign them a unique Identifying code. This allows us to track repeat visits. Specifically, we can tell you which companies are visiting your website, which pages they’re viewing, and which sources directed them there.
On your end, all you have to do to start uncovering visitors is add our tracking script to your website.
Where do I get my unique pixel code script & how do I install?
Once you login to your client dashboard the pixel script can be found in your left navigation bar under installation.
FOR HTML & SCRIPT USERS
Once you gain access to your client dashboard, please go to “Configuration” in your left navigation, go to “Installation” here is where you will find your website’s unique custom script to add to your website header.
These instructions are from our strategic partner which covers a variety of website-building platforms and shows where the HEADER Code needs to be installed.
Installing First VisitorID on Drupal
The instructions below walk through installing the tracking codes on a Drupal site:
Follow the steps below to copy the First VisitorID tracking code in your Drupal account.
- Log in to your Drupal admin dashboard
- Click Structure in the main navigation menu.
- Then select Blocks.
- Click + Add Block.
- Fill in the fields for your new block. (Title, Description)
- Paste the tracking code in the Block body field
- Text Format= “Full HTML” Please note that in some versions of Drupal, you may need to click Plain Text Editor beneath the Block Body field to ensure that your text is entered as HTML instead of rich text.
- Region Settings –> Bartik (Default Theme) <Footer>
- Then click Save block.
Now you have installed your Firsdt VisitorID Tracking codes.
How to Install Script or WP Plugin?
Getting started is easy, once your account has been activated and you receive an email notification. You have 2 options to connect directly to our AI-Powered Technology. For websites created in WordPress, simply add our WordPress Plugin to your website and follow the installation instructions. For websites not created in WordPress, add a small pixel script to the header of your website.
To learn more visit our installation instructions or add for those who have a WordPress design.
Where Do I Find My WP Plugin & setup instructions?
To get started visit our download page to get your WordPress Plugin. Please follow the step-by-step guidance to confirm and verify your website has been connected & registered with our unique AI-Powered Technology.
NOTE!
Full installation can not take place until after you receive email confirmation your website profile has been setup on our AI platform
Installing First VisitorID on Square Space
Step 1: Go to the “Cog” icon of your SpuareSpace account.
Step 2: From the “Settings Menu” navigate to “Advance” –> “Code Injection”
Step 3: Paste the First VisitorID HTML script in the “Header” section textarea.
Step 4: Your First VisitorID Tracking code is installed!
Installing First VisitorID on Instapages
Steps 1. Login to Instapages and open your landing page.
Step 2. Click on “Settings” from your edit screen.
Step 3. Click on the “Java Script” icon.
Step 4. Paste the First VisitorID script into the “Header”.
Step 5. The First VisitorID Tracking code is now installed.
Installing First VisitorID on Shopify
Step 1. Log in to your Shopify account.
Step 2. Select the online store.
Step 3. Click on the “Themes” Icon.
Step 4. Next, in the “Current Theme” section, navigate to the “Actions” drop-down menu and select “Edit Code”.
Step 5. Under layout, select the theme .Liquid.
Step 6. Scroll down until you find the following tag: [/head].
Step 7. Paste the First VisitorID Tracking Code just before this tag.
Step 8. Click the Save Icon.
Step 9. Your First VisitorID Tracking Code is now installed.
Installing First VisitorID on Unbounce
Step 1. Login to your Unbounce account.
Step 2. Open your landing page.
Step 3. Click on “Javascripts” from your edit screen.
Step 4. Paste the First VisitorID Tracking Code into the “Head”.
Step 5. Click on “Done” and your First VisitorID Tracking Code is installed.
Installing First VisitorID on Weebly
Step 1. Login to your Weebly Admin Dashboard.
Step 2. Click on “Settings” on the top right of the navigation bar.
Step 3. Click on “SEO” from the left panel.
Step 4. Paste the Visual Visitor Tracking Code in the “Header Code”.
Step 5. Click on “Save” and publish to your website.
Step 6. Your First VisitorID Tracking Code is not installed.
Why am I not receiving leads after successfully installing the code?
Gathering leads depends on the type of traffic your website is receiving. By default, First VisitorID only shows the companies
visiting your site. If there are only individual consumers viewing your web page who show up as their ISP, leads will
not be generated. If you want to see that you are getting traffic to your site even though you have not gotten any leads, follow
the steps below:
Search Leads > UnCheck ‘Only Search Companies’ > Search
You will be able to see that you do have traffic to your site, just not companies that are using a registered IP address. If a small
business (home users, someone working from home, etc) visits your site through their Internet Service Provider, they will show
up as that ISP (AT&T, Comcast, etc).
For our customers who do receive a lot of traffic from those types of users/businesses, we recommend looking at our Identify ANYONE
email campaign feature. This is also part of the FirstVisitorID package and fully functional during the free trial. If you would like to
learn more about this feature, please let us know. We have easy step-by-step instructions available!
Thank you,
First VisitorID Support
NO CREDIT CARD REQUIRED
Reduce Prospecting time by as much as 80%
MUCH Better than “stats, website traffic, and analytics” you receive from most providers, we deliver RESULTS “Companies Data and Real People”.